
Look inside the notebooks of any student who gets excellent grades and in most cases, you’ll find that they have a pristine notebook, too.
Before you begin, make sure you’ve already started reading your textbook and have made gorgeous annotations inside it.
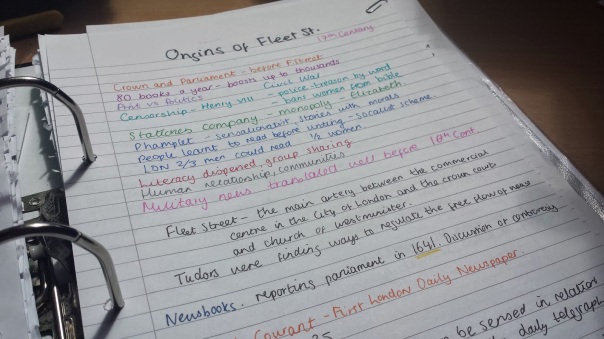
Learn more about how to use a textbook. See examples of more great notes here.
Now, follow these steps to transfer your notes to an A4 pad. This key learning exercise is suitable for Years 10-12 and undergraduate level.
Part A: Stationery Shopping!
- Get three colours of pens ready: black, blue and one other colour
Always write in black or blue. Use the other colour to draw boxes, underline important words or make things stand out. - Use a large, sturdy, lined A4 pad.
Do not use notebooks smaller than A4, and do not use notebooks with cartoons or other distractions pre-printed on the pages.
Part B: Making notes
- If the teacher gives you notes for their PowerPoint lecture, don’t use them. Make your own notes instead. You learn by making notes!
- Always write the date, title and subject in the same places on the page.
It’s a simple rule but many students (especially in middle school) still don’t do this! - Use the same subheadings as the textbook.
Organise your notes by writing titles and subtitles. Use the same subtitles that your textbook uses, and summarise the essence each section into your own words (see tip #8). Do not try to keep your notes to one page per section. This will become very restricting in future. - Add textbook reference next to the title.
Always write the textbook page number in your notebook. If the teacher doesn’t tell you, just ask them for it. - Use at least two colours.
Colours guide the eye around the page. Use them logically: one colour for headings, another for questions, and another for definitions, etc. Only use legible colours such as black, blue and one other colour. Write mostly in black or blue. - Summarise the textbook’s content into your own words.
Include: important words and definitions; diagrams; mnemonics and things you need to memorise. Exclude: chapters not on the course; things that won’t be tested; and those superfluous information boxes that don’t help you to remember the important stuff. Add things at you learn from examiners’ reports to your notes in future (see tip #13). Write very neatly in easy-to-read, lowercase letters. - Draw diagrams large and clear.
Every time you draw a diagram, you need to label it and explain what it means. Keep diagrams simple enough that you can reproduce them quickly and accurately during an examination if you need to. Don’t print ‘perfect’ diagrams and stick them into your notes. - Write notes using “examination language”.
The definitions and explanations in your notebook should be acceptable to use as answers in an end-of-year examination. The glossary in your textbook is the best source for definitions of scientific words. Make sure you can explain the concepts learned in both colloquial language and in exam-specific language. - Leave plenty of white space on the page. Don’t try to save paper!
White space is crucial to making the notes easy to re-read so don’t cram your text onto the page: leave some white spaces where necessary (e.g. between paragraphs and in the margin). You will probably need to come back to your notes and add tips, definitions and facts that you learn from examiners’ reports later on (see tip #13). Your goal should be to use up every page of your notebook – not to save paper.
Part C: Reading and sharing your notes
- Re-read your notes regularly
Add to your notes using new knowledge you’ve learned from the textbook (and from class). This is why it’s important to keep your notes tidy and organised! - Add comments from examiners’ reports.
For example, “always write the ‘+’ symbol near the nitrogen atom on an amino acid in an acidic environment” would be a great comment to add (with a diagram) to the biomolecules section of your Chemistry notebook. This comment is paraphrased from a VCAA Examiners’ Report. - Share your notes proudly with students who miss lessons.
Email them or share them online. - Re-make them into larger versions and put them onto your wall.
This not only looks impressive but also reminds you to stay focussed as examinations draw closer.
There are dozens of great note-taking tutorials on YouTube. Here’s one you can refer to for Science classes. Remember that the specifics of note-taking vary from person to person but keeping your notes complete, neat and organised should be one of your most important learning goals as a student.
Any questions? Are you a student with note-taking tips? Leave a comment below!

James, would you make any changes for a graduate program? It seems this process takes a fair amount of time, which is necessary for learning, but is unfeasible in rigorous programs such as med school.
LikeLiked by 1 person
I’d recommend the same process for a graduate program with a few modifications:
(1) write essays instead of (or in addition to) doing practice examinations;
(2) practice both typed and hand-written essays
LikeLiked by 1 person
Nowadays I use a bambook.nl book, it’s like a whiteboard, you can also use diff pens, and after the session you can scan the book in, and wipe it
LikeLike
Hi James! I too believe learning happens in the act of taking notes, and students become happy when they study with pre-made notes but it actually deprives them of an interesting and joyful learning process. When they make their own notes of say Chemistry then they stuck at many places and hence take help from various resources like the internet, reference books, and Chemistry tutors, etc. In this way they come across various related topics and get better and deeper knowledge, also the knowledge they get become easy for them to remember. So, Students must make their own effective notes for better learning. Thanks for such a helpful post. Keep sharing!
LikeLike